
How to Flush a Water Heater Step by Step: The Homeowner’s Guide
Your water heater is the hardest-working appliance you never think about. Every day it heats 40 to 80 gallons of water, and every gallon leaves behind a trace of minerals. That sediment settles at the bottom of the tank, forcing the burner or heating element to work harder, making the unit rumble and pop, and quietly cutting years off its life.
The fix is wonderfully simple: flushing the tank once a year drains that sediment away, keeps your hot water hot, your energy bills honest, and your heater running its full lifespan. It takes about an hour, costs almost nothing, and needs no special skills. In our seasonal home maintenance routine, this is one of the highest-value hours you will spend on your house all year.
Key Takeaways
- Flush your water heater once a year to remove sediment that causes rumbling, inefficiency, and premature failure.
- Always turn off the power or gas and shut off the cold-water supply before draining the tank.
- Drain the tank fully, then stir up remaining sediment with short cold-water bursts before refilling.
- Never restore power until the tank is completely refilled — dry-firing burns out electric elements in seconds.
- The whole job takes about an hour with a garden hose, a bucket, and basic hand tools.
Why Flushing Your Water Heater Matters
All tap water carries dissolved minerals, and heat turns them into solid scale that collects at the bottom of the tank. In hard-water areas, a year of sediment can be several inches deep — and it hurts in three ways.
Sediment insulates the water from the burner or element, so the unit burns more energy for the same heat. It causes spot overheating that stresses the metal and shortens the heater’s life; many manufacturers require annual flushing to keep the warranty valid. And it makes the heater noisy — the rumbling and popping you hear is water trapped under sediment flashing to steam.
Sediment also displaces water, so a silted 50-gallon tank holds far less hot water than you paid for — that is why showers go lukewarm halfway through. A yearly flush restores that capacity, which is why our home maintenance checklist treats the water heater as a recurring line item.
How Often Should You Flush a Water Heater?
Once a year is right for most homes, but your water changes the math:
- Hard water (white scale on faucets): flush every six months.
- Soft or filtered water: once a year is plenty.
- Well water: every six months; well systems often carry sand and grit that settle faster.
- New heaters: start in the first year — sediment accumulates from day one.
Set a recurring reminder for the same weekend every year, paired with another annual task like testing smoke detectors. If it lives on the calendar, it gets done.
Safety First: Read This Before You Touch Anything
You are dealing with scalding water plus electricity or natural gas, so respect the process:
- Power first. Switch off the breaker for an electric heater; for gas, turn the control knob to “pilot.” Never heat an empty or half-empty tank.
- Cool down. Tank water can top 140°F. Let it cool for several hours (overnight is ideal), and wear gloves and closed-toe shoes.
- Relieve pressure carefully. You will test the temperature-and-pressure (T&P) relief valve — stand to the side, not in front of it.
- Protect the floor. Lay old towels around the drain and relief valves, and route the drain hose to a floor drain, sump pit, laundry sink, or outdoors.
- Know when to call a pro. If the drain valve is corroded shut, the T&P valve is stuck, or the heater is 12+ years old and never flushed, call a plumber instead.
What You’ll Need
- A garden hose long enough to reach your drain point
- A bucket for the initial test flow and drips
- An adjustable wrench or pliers for a stubborn drain valve
- Old towels, work gloves, and closed-toe shoes
The Step-by-Step Flush
Step 1 — Shut off the power or gas
For electric heaters, switch off the dedicated breaker. For gas, rotate the control knob to “pilot.” Heating an empty tank can destroy an electric element in seconds, so photograph the switch positions first.
Step 2 — Shut off the cold-water supply
Close the shutoff valve on the cold-water inlet pipe at the top of the heater (a quarter turn on most ball valves). If there is no dedicated valve, close the main water valve to the house before you start draining.
Step 3 — Let the water cool
Give the tank several hours to cool — overnight is safest. If you are in a hurry you can skip the wait, but handle the drain hose with gloves, because the first gallons will be scalding.
Step 4 — Attach the garden hose
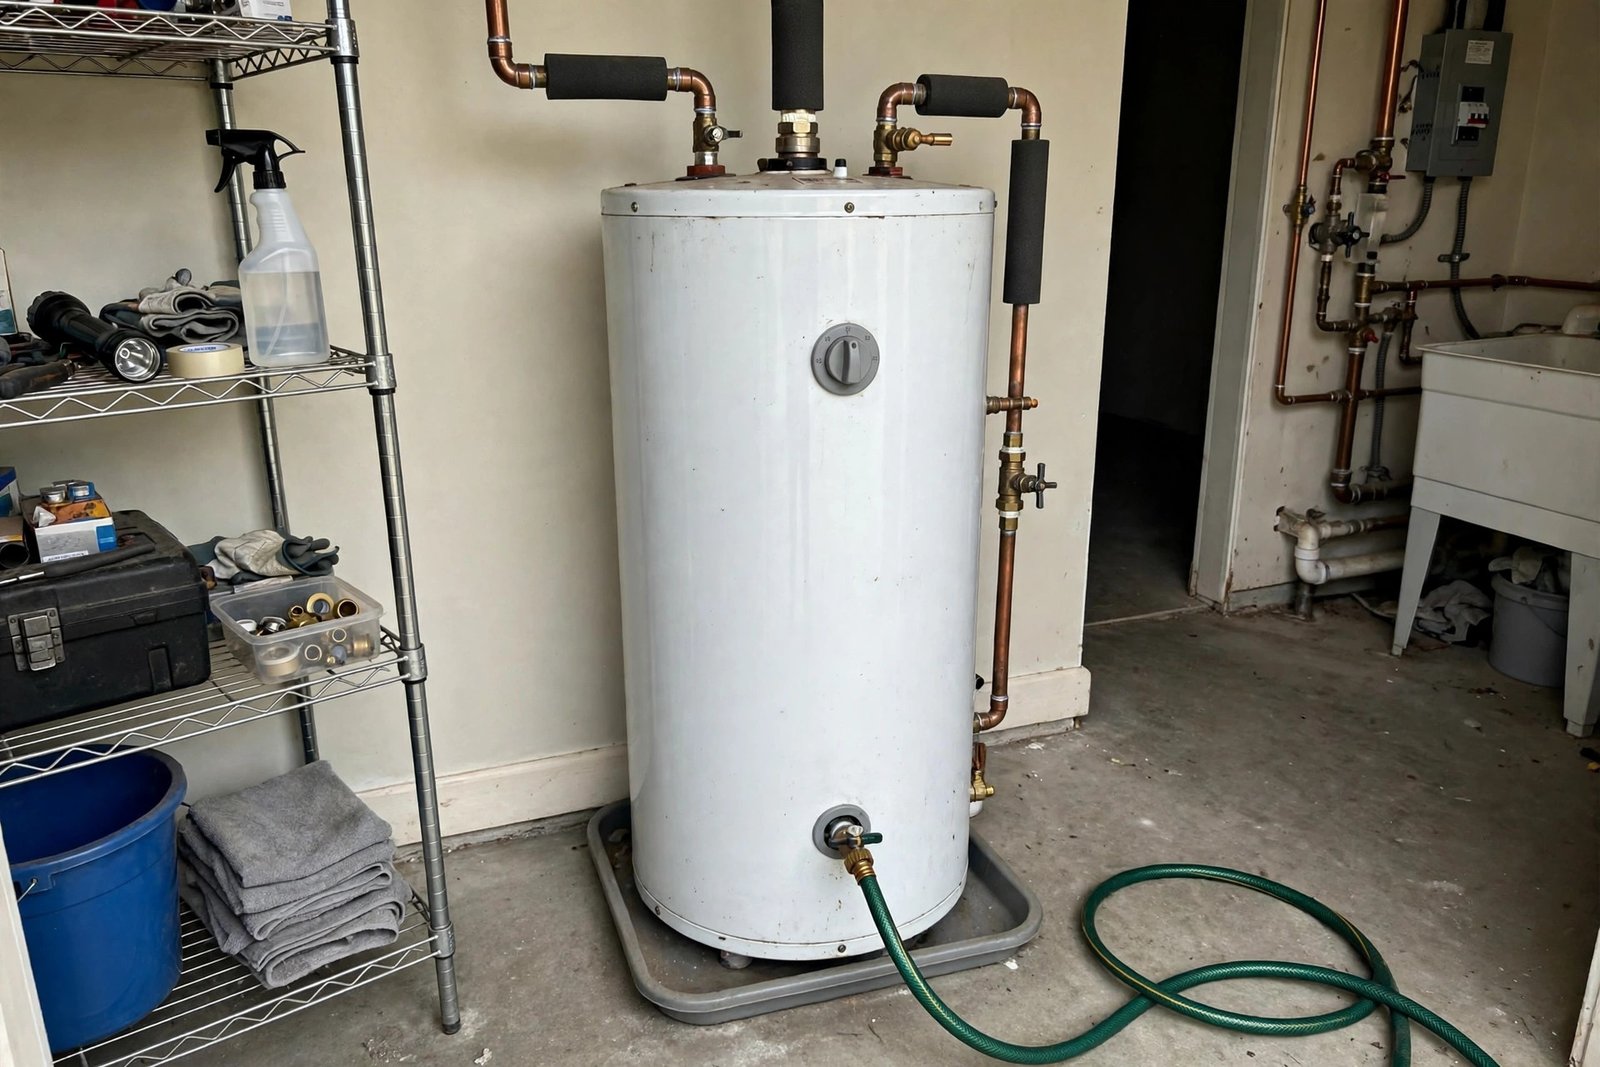
Thread the hose onto the drain valve near the bottom of the tank and run the other end to a drain point lower than the valve, so gravity does the work. Secure the hose end so it cannot whip loose when flow starts.
Step 5 — Open a hot-water faucet and the T&P valve
Open the nearest hot-water tap fully to break the vacuum. Briefly lift the lever on the T&P relief valve to confirm it moves freely and vent air, then let it snap shut. Water should start flowing through the hose.
Step 6 — Drain the tank completely
Slowly open the drain valve. The first water will run cloudy and gritty — that is the sediment you came for. A 50-gallon tank takes 20 to 30 minutes to empty; when the stream turns clear and slows to a trickle, you are done.
Step 7 — Stir up remaining sediment
With the drain valve open, briefly reopen the cold-water supply for 10 to 15 seconds, then close it again. The incoming water stirs up sediment clinging to the bottom and flushes it out. Repeat two or three times until the outflow runs consistently clear.
Step 8 — Close up and refill
Close the drain valve and remove the hose, then reopen the cold-water supply. Leave the hot-water faucet open until water flows steadily without sputtering — that sputtering is trapped air escaping. Close the faucet and check all fittings for drips.
Step 9 — Restore power or gas
Only when the tank is completely full: flip the breaker back on, or turn the gas control from “pilot” to your previous setting (relight the pilot if needed). Allow an hour or two to recover, then run a hot tap to confirm everything works.
Step 10 — Check the anode rod (optional but smart)
The anode rod is the sacrificial metal rod that protects the tank from rust. On heaters over five years old, unscrew it from the top and inspect it: if it is thinner than half an inch or caked in calcium, replace it — a cheap part that can add years to a tank’s life.
4 Tips That Make the Job Easier
Cheap plastic drain valves clog or snap. Upgrading to a full-port brass ball valve during your first flush makes every future flush faster — and costs less than a pizza.
A sediment-free tank heats more efficiently, so schedule your flush in early fall. Your heater will be at its best just when hot-water demand peaks.
Route the hose so it runs continuously downhill to the drain. Every uphill foot slows draining and leaves water behind.
Snap a photo of the thermostat dial, breaker, and gas knob before touching anything. Restoring settings from a photo takes seconds.
Troubleshooting
Water barely trickles from the drain valve. The valve is likely clogged with sediment. Gently work it open and closed, or clear the clog with a short piece of stiff wire — wear gloves and expect a gush.
The T&P valve drips after testing. Grit may be keeping the seat from sealing. Lift the lever sharply once or twice; if it still drips after an hour, replace the valve — an inexpensive but important safety part.
Water looks rusty after refilling. Brief rustiness right after draining is normal. Run a hot tap for a few minutes until it clears. If rust persists beyond a day, the tank lining or anode rod may be failing — get a professional opinion.
Frequently Asked Questions
Can I flush a water heater myself, or do I need a plumber?
Most homeowners can do it — it takes a garden hose and basic caution, not plumbing skills. Call a plumber if the drain valve is corroded shut, the heater is over 12 years old and never flushed, or you find leaks or a stuck relief valve.
What happens if you never flush a water heater?
Sediment builds up, efficiency drops, the heater gets noisy, capacity shrinks, and the tank’s lifespan shortens by years. Manufacturers can also void the warranty on a tank that was never maintained.
Is it safe to flush a water heater that hasn’t been flushed in years?
Usually yes, but be cautious with heaters over 10 years old that were never maintained — disturbing long-settled sediment can expose leaks or clog the drain valve. For a badly neglected heater, a plumber’s first flush is the safer call.
Do tankless water heaters need flushing too?
Yes — tankless units need annual descaling with a pump and vinegar solution circulated through the unit. The process differs from a tank flush, so follow your manufacturer’s instructions.
Should I drain the water heater while on vacation?
No need. For trips longer than a week, switch a gas heater to vacation mode or lower an electric heater’s thermostat to save energy. A full tank is safer than an empty one.
One Hour, Once a Year, Years of Hot Water
Flushing your water heater pays for itself quietly: lower energy bills, a quieter heater, fuller hot showers, and a tank that lives out its full warranty instead of dying early. Mark it on your calendar or pair it with another annual ritual — whatever it takes to make it happen. And while you are in maintenance mode, tackle the other jobs that keep appliances healthy: a deep clean of your oven follows the same principle — an hour of care that saves you from an expensive replacement later.
Already finished your flush? Check the anode rod while you are at it, jot the date on a label stuck to the tank, and enjoy hearing absolutely nothing from your water heater. Silence, in this case, is the sound of a job well done.
2 thoughts on “How to Flush a Water Heater Step by Step: Homeowner’s Guide”