
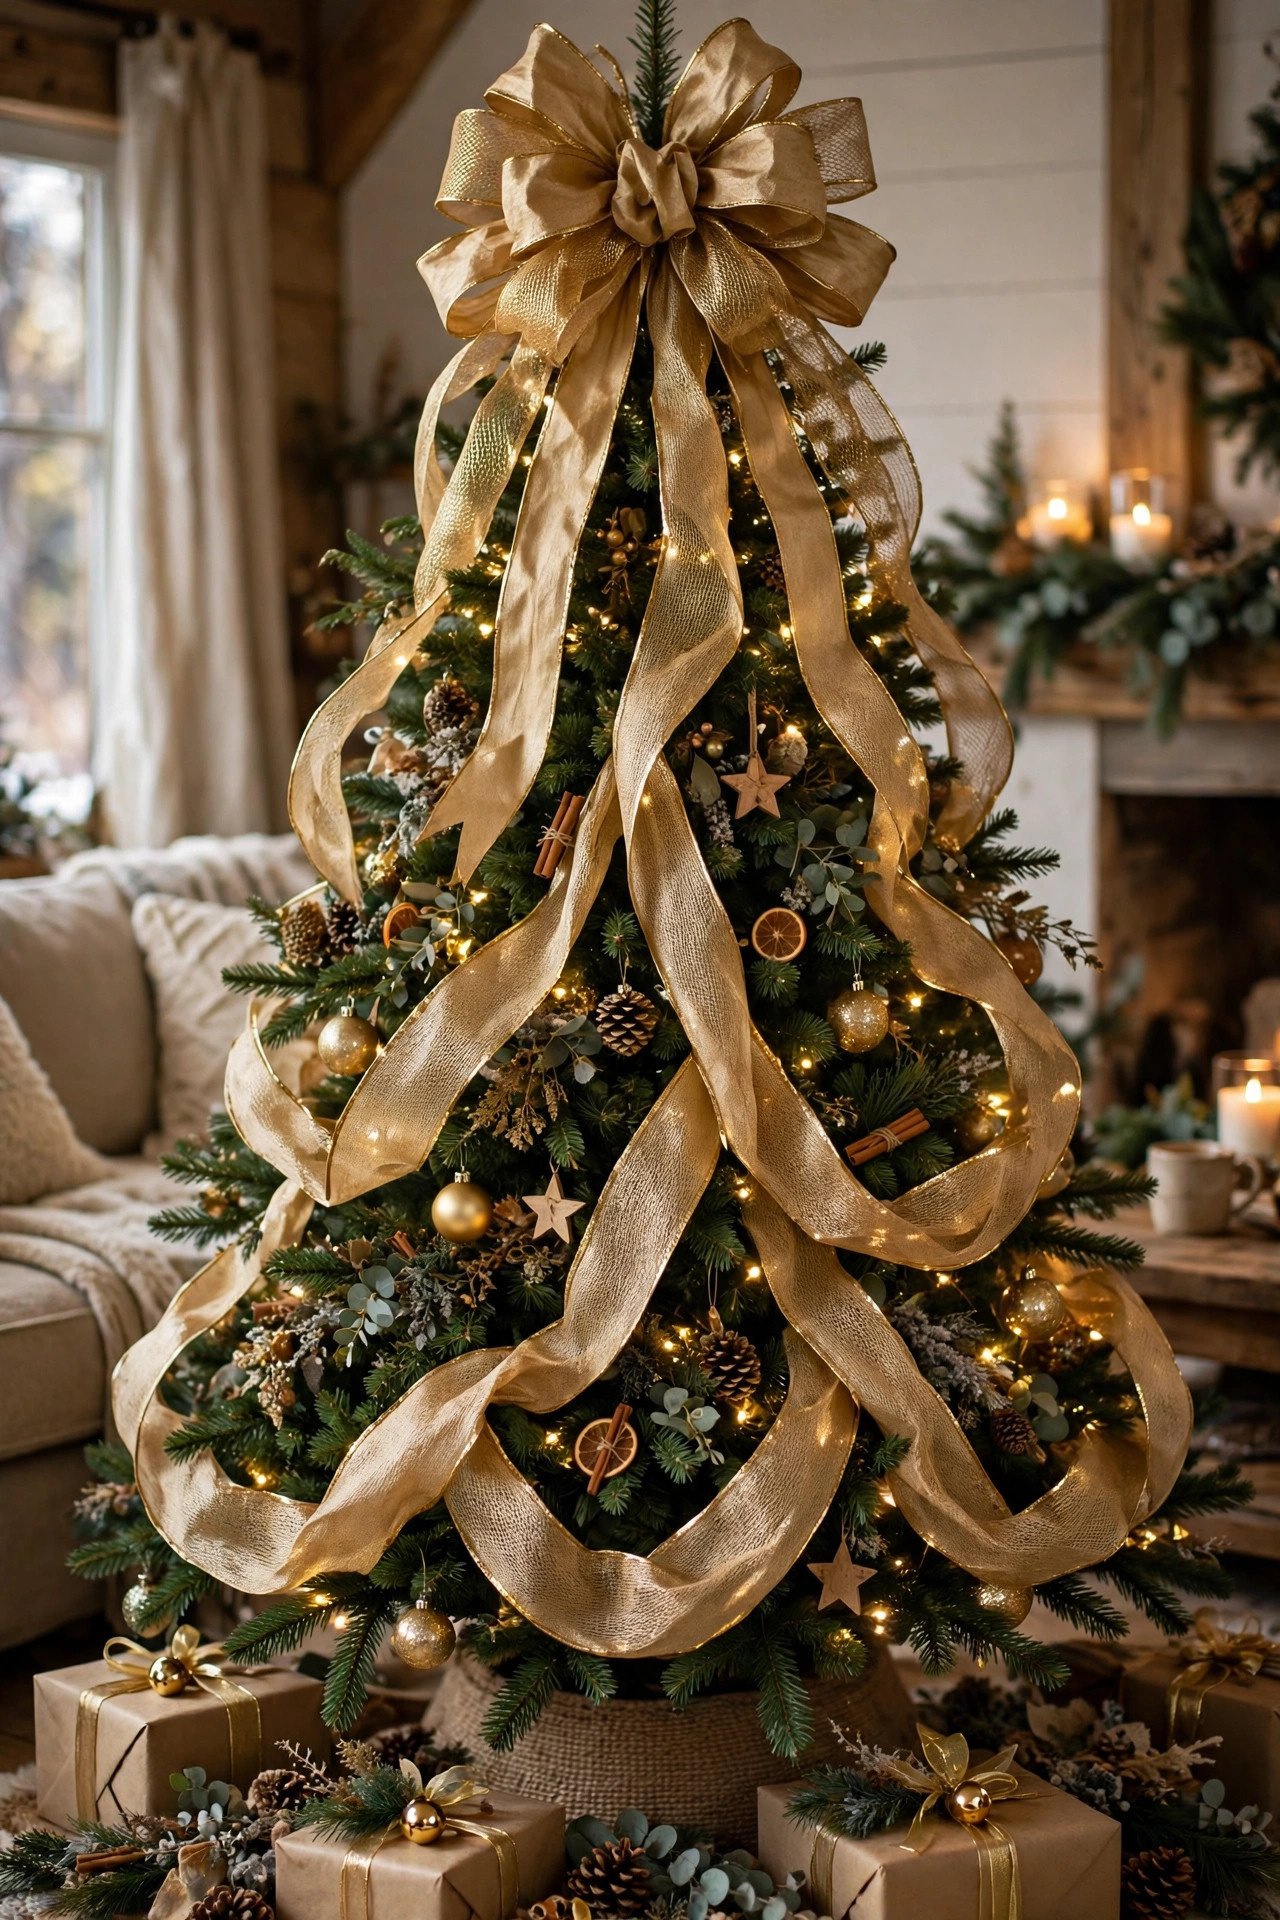
Christmas Tree Ribbon Ideas: Wired Techniques & Bows
Ribbon is the single most transformative decoration on a Christmas tree. Baubles add sparkle and lights add glow, but ribbon adds movement, structure, and a finished, designer look — it is what makes a tree look like it came from a magazine rather than a box of assorted ornaments. The good news: working with wired ribbon is far easier than it looks, and once you learn three basic techniques, you can style any tree in any colour scheme.
This guide covers Christmas tree ribbon ideas for 2026: choosing wired ribbon, the cascading, tucking, and bow techniques, colour schemes that work, and how to finish with a show-stopping topper. For the rest of your tree scheme, see our jewel tone Christmas tree ideas and Christmas tree collar ideas.
Key Takeaways
- Always use wired ribbon — it holds its shape, while non-wired ribbon collapses into the branches.
- Use 2.5-inch ribbon for standard trees; wider ribbon (4 inch) suits large trees and statement looks.
- Plan on roughly 10 yards of ribbon per foot of tree height for a full cascade look.
- Work top to bottom, and step back often to check the overall balance.
Choosing the Right Ribbon
Wired ribbon has thin wire along both edges, so it holds loops, twists, and bows exactly where you put them. It is non-negotiable for tree decorating. Width matters: 1.5-inch ribbon gives a delicate, traditional look; 2.5-inch is the versatile standard; 4-inch makes a bold, modern statement and works best on trees over 7 feet. Fabric matters too: velvet reads luxurious and photographs beautifully; satin gives shine; burlap and grosgrain suit rustic and woodland trees; sheer organza adds softness over a heavily ornamented tree.
Buy more than you think you need — running out halfway is the classic ribbon mistake. One spool (usually 10 yards) covers a small tree; a 7-foot tree with a full cascade needs three to four spools. Keep the receipt: unopened spools can go back, but a half-finished tree cannot wait for a delivery.
Technique 1: The Cascade (Waterfall)
The cascade is the most dramatic ribbon style: long lengths of ribbon flow from the top of the tree down to the base in gentle waves. Cut ribbon into 3-foot lengths (longer for tall trees). Starting at the top, tuck one end deep into the branches, let the ribbon fall, and tuck it back in every 12 inches or so, creating soft loops between anchor points. Work around the tree in a spiral, spacing the cascades evenly — usually four to six cascades for a standard tree.
Let the ribbon twist naturally as it falls; the twists catch light and create movement. Secure each tuck with a branch — bend the branch tip around the ribbon rather than using pins or wire, which can damage the tree. Finish the bottom of each cascade with a loose curl or a small bow.
Technique 2: Tucks and Loops (the Designer Shortcut)
If cascades feel ambitious, tucks and loops give a polished look with less ribbon and less fuss. Cut ribbon into 12–18 inch pieces. Fold each piece into a loop (or a figure-eight for more volume), pinch the centre, and tuck it into the branches at varying depths — some deep, some near the tips. Scatter 15–25 loops evenly around the tree, then add baubles on top. The loops read as ribbon from a distance but take minutes to place, and they are easy to adjust after the ornaments go on.
This technique is ideal for heavily ornamented trees, because the ribbon accents rather than competes. It also uses half the ribbon of a cascade, making it the budget-friendly choice.
Technique 3: The Statement Bow Topper
A big, beautiful bow is the classic tree topper and the perfect finish for a ribbon-styled tree. To make one: form two large loops (about 10 inches each) with wired ribbon, pinch and wire the centre, then add two more smaller loops on top and two trailing tails. Fluff each loop by pulling the wire edges into shape, and attach the bow to the top branch with floral wire. Add a few sprigs of fir or berries behind the bow for a fuller finish.
If bow-making feels daunting, buy a pre-made designer bow and add your own tails — nobody will know, and the result looks identical. For a modern alternative, skip the bow and top the tree with a star or angel, letting the cascade ribbon flow up to meet it.
Colour Schemes That Work
Classic red and gold: Red velvet ribbon with gold baubles is timeless and photographs beautifully. Icy blue and silver: Silver or pale-blue ribbon with white lights suits modern homes and flocked trees — see our icy blue Christmas decor ideas. Woodland neutrals: Burlap or sage-green ribbon with wooden ornaments and dried oranges. Bold jewel tones: Emerald or burgundy velvet ribbon with matching baubles for a rich, dramatic tree. Whatever scheme you choose, use one ribbon colour (or two at most) — three or more ribbons fighting for attention is the fastest way to a cluttered tree.
Common Ribbon Mistakes (and Fixes)
Ribbon disappearing into the tree: You tucked too deep. Pull loops further out so they sit on the branch tips, not inside the foliage. Tree looks lopsided: You worked one side at a time. Decorate in rounds — place a few cascades, step back, rotate the tree, and repeat. Ribbon looks flat: You used non-wired ribbon, or you have not shaped the wire edges. Pinch and curl each loop after placing it. Running out mid-tree: Finish with the tuck-and-loop technique on the back of the tree, where less ribbon shows, and save the cascade for the front.
After Christmas: Storing Ribbon
Wired ribbon stores beautifully if you roll it rather than fold it — folding kinks the wire permanently. Roll each length around a cardboard tube or an empty kitchen-roll tube, secure with a rubber band, and store in a box away from crushing. Good wired ribbon lasts for years, so this year’s investment styles next year’s tree too.
Frequently Asked Questions
How much ribbon do I need for a 7-foot tree?
For a full cascade look, plan on 60–70 yards (three to four 10-yard spools, doubled). For tucks and loops, 20–30 yards is plenty.
Can I use non-wired ribbon on a Christmas tree?
You can, but it will not hold loops or bows — it collapses into the branches and looks flat. Wired ribbon is worth the small extra cost for the difference it makes.
Should ribbon go on before or after baubles?
After lights, before baubles. This order lets the ribbon sit naturally in the branches while baubles fill gaps and hide attachment points.
What width ribbon is best for a small tree?
For trees under 5 feet, use 1.5-inch or 2.5-inch ribbon. Wide 4-inch ribbon overwhelms a small tree and hides the ornaments.
Ribbon is the fastest upgrade you can give a Christmas tree: one spool, three techniques, and a tree that looks professionally styled. Start with tucks and loops if you are new, graduate to cascades when you are confident, and finish with a bow you are proud of.